The first time I tried to shoot at night, I honestly thought my camera was broken.
The photo came out dark. So I made it brighter. Then it looked like it was covered in sand. Grain everywhere.
I remember sitting there thinking, “Why does this look so bad when it looked fine in real life?”
That’s when I discovered ISO.
At first, it sounded technical. Almost intimidating. But once I understood it, photography started to feel… easier. More predictable.
If you’ve ever felt confused about camera settings, you’re not alone. I’ve been there. And I’ll explain this the same way I wish someone explained it to me,simple, practical, and without unnecessary jargon.
What You Will Learn
How to define ISO in photography in simple terms
What ISO actually does inside your camera
How ISO numbers work (without confusion)
When to use low vs high ISO
How ISO affects brightness and image quality
Common mistakes I made (so you don’t repeat them)
How to choose the right ISO step by step
Define ISO in Photography (Simple Explanation)
Let’s answer the main question: What is ISO photography?
ISO controls how sensitive your camera is to light.
That’s the simplest way I can put it.
When I increase ISO, my camera needs less light to take a photo. When I decrease it, my camera needs more light.
That’s it.
Think of it like this:
Low ISO → less sensitivity → cleaner image
High ISO → more sensitivity → brighter image
But there’s a trade-off. And this is where most beginners get confused.
Higher ISO doesn’t just make your photo brighter. It also adds noise.
I didn’t understand this at first. I kept increasing ISO thinking “brighter is better.” Spoiler: it’s not always better.
What Does ISO Stand for in Photography?
ISO stands for International Organization for Standardization.
Yes, it sounds like something from a textbook.
When I first heard it, I thought I needed to memorize it. Turns out, I didn’t.
In photography, ISO is simply a standard scale that tells us how sensitive the camera sensor is to light.
This system started with film photography. Different films had different sensitivity levels. Digital cameras continued the same concept.
So while the full form sounds serious, in real life, we mostly care about what ISO does.
ISO in Photography Explained with Real Examples
Iso photography
ISO only starts to make sense when you see it in real situations.
So let me explain it through moments I personally experienced.
Shooting in Low Light
I still remember one birthday party I attended. It was indoors, with dim lights and a warm atmosphere. It looked great in real life.
I took out my camera, framed a nice shot, and clicked.
The result?
Dark. Almost unusable.
At that moment, I had two choices,blame the camera or figure out what went wrong.
So I started adjusting my settings slowly.
I increased the ISO and took another shot.
This time, the image looked brighter. Faces were visible. Details came back. I felt like I had fixed the problem.
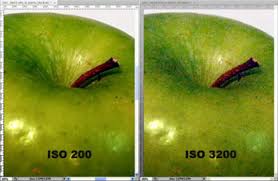
But when I got home and zoomed in, something felt off.
The image looked rough. Tiny colored dots appeared everywhere. It didn’t look clean anymore.
That’s when I learned about noise.
At that moment, it hit me: ISO doesn’t just brighten your image. It comes with a cost.
And that cost is image quality.
Shooting in Bright Light
Now let’s flip the situation.
Imagine you’re outside on a sunny day. There’s plenty of natural light. Everything looks sharp and vibrant.
One time, I forgot to adjust my settings after shooting indoors. My ISO was still high.
I clicked a photo outside.
The result?
Completely overexposed.
The image looked washed out. Highlights were blown. Details were gone.
That’s when I realized something important:
ISO is not something you set once and forget.
It depends entirely on your environment.
So I lowered the ISO, took another shot, and there it was, clean, sharp, and balanced.
The Simple ISO Rule I Follow
After making these mistakes more times than I’d like to admit, I built one simple habit.
Before touching any setting, I ask myself one question:
“Do I have enough light?”
That’s it.
If the answer is yes, I keep ISO low.
If the answer is no, I increase ISO carefully.
This one small habit saved me from so many bad shots.
And the best part? It removes confusion.
No overthinking. Just a simple decision.
ISO Number in Photography: Understanding the Scale
When I first saw ISO numbers, I was confused.
100, 200, 400, 800—it felt random.
But once I understood the pattern, everything clicked.
Think of ISO like steps on a staircase.
Each step doubles the light sensitivity:
ISO 100 → base level
ISO 200 → twice as sensitive as ISO 100
ISO 400 → twice as sensitive as ISO 200
ISO 800 → twice as sensitive as ISO 400
And it keeps going.
So when I move from ISO 100 to ISO 800, I’m not making a small change. I’m increasing sensitivity significantly.
What ISO Numbers Mean in Real Life
Let’s say I’m shooting indoors.
At ISO 100, the image is too dark.
At ISO 400, it starts looking usable.
At ISO 800, it’s bright enough.
But at ISO 1600, I might start seeing noticeable grain.
Controlled lighting means you don’t need high ISO.
You control the environment—so you control the quality.
When to Use High ISO (Without Fear)
I used to avoid high ISO completely.
Now I don’t.
Because sometimes, it’s necessary.
Night Photography
There’s very little light.
You either increase ISO… or get a dark image.
Simple choice.
Indoor Events
Lighting changes constantly.
You don’t always have time to adjust everything.
ISO helps you react quickly.
Fast Action Shots
If I’m shooting something moving fast, I need a fast shutter speed.
That reduces light.
So I increase ISO to balance it.
My Honest Take
High ISO isn’t the enemy.
Misusing it is.
Pros and Cons of ISO Adjustment
Pros
Helps in low-light situations
Allows faster shutter speeds
Makes handheld shooting easier
Cons
Adds noise
Reduces image quality
Can ruin photos if pushed too far
Common ISO Mistakes I Made (So You Don’t Have To)
Using High ISO in Daylight
I’ve done this more than once.
The result? Overexposed, grainy images.
Ignoring Noise
Everything looked fine on the camera screen.
But later, the grain was obvious.
Always zoom in and check.
Relying Only on ISO
I ignored aperture and shutter speed completely.
That limited my results.
Not Testing My Camera Limits
Every camera handles ISO differently.
I didn’t realize this early.
Now I test mine in different conditions.
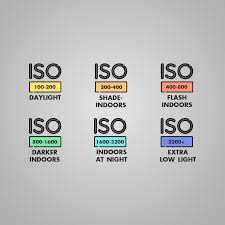
Best ISO Settings for Different Situations
Here’s what I personally use:
Bright daylight → ISO 100–200
Indoor → ISO 400–800
Low light → ISO 1600+
These are starting points—not strict rules.
Always adjust based on your scene.
How to Choose the Right ISO (My Step-by-Step Method)
This is my exact process:
I check the lighting
I start with the lowest ISO
I adjust aperture and shutter speed
If needed, I increase ISO slowly
No guessing. No stress.
Decision-Making Guide (Quick Help)
If you’re unsure, follow this:
Bright scene → Use low ISO
Dark scene → Increase ISO
Moving subject → Higher ISO may help
Best quality needed → Keep ISO low
And if you’re still unsure…
Take a test shot.
I still do this all the time.
Pro Tips I Learned From Experience
Use a Tripod
If your subject is still, use a tripod instead of increasing ISO.
Cleaner results.
Shoot in RAW
RAW files give more flexibility in editing.
Especially useful for reducing noise.
Don’t Fear Noise Too Much
A slightly grainy photo is still usable.
A blurry photo is not.
Know Your Camera
Every camera behaves differently.
Spend time testing yours.
That knowledge is more valuable than any setting.
Final Thoughts: Keep ISO Simple and Practical
When I first started, ISO felt confusing. Too many numbers. Too many “rules.” I kept second-guessing every shot.
Now I see it differently.
ISO isn’t something to memorize. It’s something you feel with practice.
These days, I don’t think in numbers first. I think in light.
If there’s plenty of light, I keep ISO low. If light is limited, I raise it, carefully.
That’s it.
No complicated formula. No overthinking.
And here’s something I learned the hard way: A technically “perfect” photo doesn’t matter if you miss the moment.
Sometimes a little noise is completely fine. But a missed shot? You don’t get that back.
So don’t be afraid to use ISO when you need it.
Test your camera. Make mistakes. Look at your photos later and learn from them. That’s how it really clicks.
Over time, adjusting ISO becomes automatic. You’ll stop thinking about it and just know what to do.
And when that happens, photography becomes a lot more fun.
FAQ Section
What is ISO photography in simple words?
ISO photography refers to how sensitive your camera sensor is to light. When I increase ISO, my camera captures brighter images in low light. When I keep it low, I get cleaner and sharper photos with less noise.
How can I define ISO in photography easily?
If I had to define ISO in photography simply, I’d say it controls brightness by adjusting light sensitivity. It helps me shoot in different lighting conditions without changing my entire setup.
What does ISO stand for in photography?
ISO stands for International Organization for Standardization. But in photography, I don’t focus on the full form much. I just use ISO as a scale to control how bright or clean my image looks.
What is ISO in photography definition for beginners?
The basic ISO in photography definition is this: it’s a camera setting that controls how sensitive the sensor is to light. I use it to balance exposure when lighting conditions change.
What is an ISO number in photography?
ISO number in photography refers to values like 100, 200, 400, 800, and so on. I treat these numbers like steps,higher numbers increase brightness but also add grain to the image.


 This is my exact process:


")


One thought on “What is ISO Photography? 7 Easy Steps to Master ISO Numbers with Confidence”